Landscaping 101: Spreading Mulch
Spreading mulch is relatively easy if you know how to do it. It also comes with several benefits. However, it can be a little complicated if you are new to it, and there is also a wrong way to do it.
Let's explore some tips that can help you spread mulch properly.
Getting the Timing Right
When it comes to mulch, the question about timing is quite common. Well, the quick answer is, you can do it either in spring or fall. Most people prefer to do it in the spring so that it looks fresh throughout the summer. If you wait for the colder months, it can look a bit faded at the end of winter.
In spring, wait until the ground has thawed before you get to spread your mulch. However, avoid waiting too long otherwise the ground will dry up. You need to do it whilst there’s still some moisture in the soil.
If the area has plants, wait until they have grown, then apply the mulch. Mulch can suppress growing plants the same way it prevents weeds from growing, so be careful.
What About the Thickness of the Mulch Layer?
It is recommended to keep the mulch layer at a thickness between 2-4 inches deep. If it’s below that, you lose all the protection from weeds. Anything above four inches will prevent water from getting in. It will also bury the base of the plants which can hinder their growth.
How to Properly Spread Mulch
Believe it or not, there is a correct and incorrect method of spreading mulch. If you fail to do it right, you might end up with some undesirable results.
If you are applying mulch to an area that doesn’t have plants then you might be in luck, it’s not too complicated. All you need to do is spread it evenly to get a nice layer of the right thickness. If, however, there are some plants, you need to be extra careful.
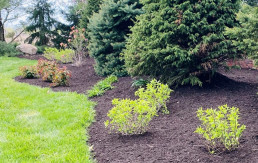
One of the most common mistakes made by new gardeners is laying heaps on mulch at the base of the plants. This is not good for the plants at all. If you bury the stems of plants and the trunks of trees, you can end up dealing with lots of pest-related issues, plant diseases, and rotting stems/trunks.
It is therefore important to ensure that there is some distance between the mulch and the base of the plants. This allows adequate air circulation around the stems and trunks. You can use your hands to spread it out and ensure that none of it reaches up to the stems. Leave about three inches of space from where the mulch ends to the base of the plant.
Supplies Needed
Apart from the mulch, there are several tools and supplies that can make your job easier. Please note that some of them are optional so if you don’t have them it’s not a total train smash.
- Garden fork
- Scoop shovel
- Wheelbarrow
- Bow rake
- Weeding tool
- Gloves
Below is a quick list of the steps that you must follow when spreading mulch:
- Do away with established weeds
- Renew the edging on the garden beds
- Spread the mulch
That’s it, now you know how to properly spread mulch. Simple right? You can go ahead and enjoy all the benefits of mulching and get that award for the best landscaped home that you have always wanted. One last thing: Don’t forget to freshen the mulch regularly.
Best Practices: Mulch!
There are a number of advantages to adding mulch to your landscape. When mulch hardwood bark mulch is applied and cared for correctly, it prevents erosion, protects plants from extreme temperatures, improves soil structure by adding organic matter, conserves soil moisture, suppresses weeds, and adds beauty to landscape plantings!
Prep Work
- Kill weeds: spray all weeds with weed killer 1-2 weeks prior to mulching. This allows them to completely die, making them much easier to pull when you are ready to get to work.
- Trim trees and bushes: Because of the debris produced, be sure the trim trees and bushes before applying your new mulch.
- Clean out mulch beds: remove all dead leaves, weeds, trimmings, and wood build up with a rake.
- Cultivate: Use a roto-tiller or hand cultivator to loosen any compacted soil or mulch. This allows moisture and air to pass through the mulch easier.
- Edge your beds: Landscapes with clean edges enhance the appearance and give a professional look. Use an edging shovel or power edger to accomplish this. Tip: Use your garden hose as a guide to create nice, flowing curves!
- Rake Smooth: Use a stiff rake, such as a mud rake, to smooth all surfaces to be mulched. Otherwise, your mulch may look lumpy.
- Apply a pre-emergent: This is the time to prevent weed seeds! Apply the pre-emergent before mulching. A second application later further ensures protection from weed seeds. Always read the product directions before application.
Installation
- It’s time to mulch: Using your hands or a rake, apply new mulch over the cultivated mulch or soil. Spread evenly approx. 3 inches thick.
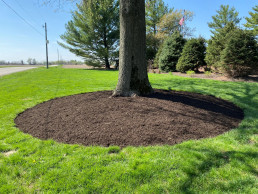
- Say no to mulch volcanoes: Mulch volcanoes occur when mulch is piled around the trunk of a tree or shrub. These are detrimental to the health of the plant by encouraging disease and decay, and preventing proper root development.
After Care
- Mulch Maintenance: After a month or so, check the mulch for compaction. If its compacted, use a garden claw or cultivator to loosen it. This allows for air and water to pass through, which helps prevent the growth of fungus and restores a fresh appearance.
- In the event of fungus: Remove it and the surrounding mulch. Rake existing mulch to cover the area. Fungus is a sure sign of too much moisture in a compacted area.
Starting a Box Garden
If you don’t have an old-fashioned garden where your plants can thrive, you can still flex those green fingers by starting a box garden. Right off the bat, box gardens offer the following benefits:
- Conveniently located – It’s up to you where your box garden goes, whether that’s over concrete or any soil type.
- Beautiful to look at – A box garden is a great landscaping feature that can make your environment more appealing.
- Provides fertile soils and good drainage for your plants – You can add fresh, high-quality, fertile soil in a contained bed, so your plants won’t have to grow up in a subpar environment. It’s also possible to use gravity to your advantage, so your garden box has optimum drainage to reduce root rot.
- Weeds are not much of a problem – If your garden box is lined, your plants won’t have to compete with the as many weeds that pop up on the ground. Because of the loose soil, it’s also easier to uproot any weeds that show up.
So, what are you waiting for? Get the lowdown on how to build your box garden now and start enjoying these benefits.
Steps to starting a box garden
Starting a box garden involves two major steps:
Installing the garden box
You can build your garden box from the ground up or by purchasing a pre-fabricated garden bed. It all depends on whether you’ve got time to burn or the expertise and tools to set things up properly. Another thing to consider is to what extent you need to customize your garden box to suit your outside area.
In any case, you can find all the materials you need from stores that sell landscaping supplies. Garden boxes are typically made from wood, recycled timber, corrugated iron, stone, or brick, whether you’re constructing on-site or buying a kit.
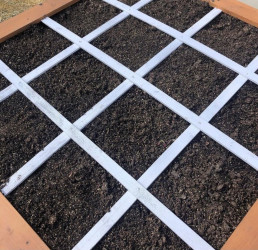
Filling the garden box
When setting up the soil for your garden box, you can mix different soils, such as compost, hay, manure, fertile native soil from your yard, or soil and mulch, or one of our specifically designed growing medias. Make sure the soil mix is not too dry or moist. It should easily combine when molded and quickly loosen when poked.
Once your garden box is lined and filled up, the next step is watering and then it’s planting time.
Consider planting annuals, perennials, or even a square foot vegetable garden.
Other things to know when starting a garden box
- If you’re renting, consider building a portable garden box. For instance, you can use a trolley or wheelbarrow to contain your plants. This gives you the added benefit of being able to move your garden box to wherever there’s a sunny spot.
- Make sure to water the soil when at least the top 5 inches of soil is no longer moist. The best time for watering is in the morning. This gives the water plenty of time to drain or evaporate, which reduces root rot.
The bottom line
Now that you’ve got the 101 on starting a garden box, up next is actually growing your favorite plants. Be sure to invest in the right landscaping supplies, so your plants thrive in the best available environment.
For instance, using the right type of mulch can be the difference between poor quality soil and healthy, aerated, and fertile soil

Building Perfect Planters
Following these simple steps, you’ll be able to plant container after container with the perfect balance of petals.
First thing’s first- you can plant a container garden in almost any kind of container with some sort of drainage hole. You are not confined to the generic clay or plastic pot found in most garden centers. Get creative — antique vessels or even drawers will bring the charm to your arrangement.
Pick your plants
We recommend a ratio of 1:3:1. One thriller (taller grass or floral focal point), 3 fillers (shorter flowers or foliage to fill out the container), and one spiller (longer, droopy plant to add interest). Consider whether your planter will be in the sun or shade when selecting your plants.
Fill your planter
To aid in drainage and add weight, fill your planter with a layer of haydite or similar aggregate in the bottom. Add soil on top, and mix in a tablespoon or so of Soil Moist to the upper layer of soil. Leave one inch without soil at the top of the pot.
Design
Think about where you will be placing your planter and where you would like your thriller (focal point) situated. This could be in the very center, or in the back of the planter if the container will be placed in a corner. The placement of your thriller is the most important aspect of your planter design.
Plant
Ruffle the roots, then insert into the soil. Cover the roots with a fresh soil layer. Introduce your thriller first, then plant your fillers surrounding your thriller. Lastly, plant your spiller where you would like to add additional detail and interest!
Water
Once you have your planter perfectly placed, be sure to water the new plants in very well!
Fertilize
For the best planter results, consider purchasing a granular, slow-release fertilizer and follow the specific instructions to keep your creation blooming all season long!

7 Simple Ways You Can Improve Curb Appeal
7 Simple Ways You Can Improve Curb Appeal
Keeping your lawn well-maintained is a great way to boost the visual appeal of your yard. Following a few tips can improve the appearance of your lawn while also keeping it healthy. Taking the extra time to care for your property is always well worth the effort, and it will keep your yard looking great at all times of the year.
Here are a few things to consider to help you boost the visual appeal of your lawn.
Remove Weeds and Debris
One of the first steps in taking care of your lawn is to always remove weeds and other debris. It’s important to pull weeds out by the entire root to avoid them coming back or spreading to other areas. You can also use various weed killers to save you time and effort. Raking up dead leaves and removing debris is also an easy way to give your lawn a much neater appearance.
Add Mulch
Adding fresh mulch is a fast and relatively inexpensive way to tidy up the yard and add an attractive detail to the overall appearance of the outside of your home. This will give your plants and flowers a pop while also protecting the soil from the sun and keeping much needed moisture from evaporating. Choose a colorful mulch to accent your landscaping if you are looking for a pop of color.
Aerate Your Yard
Another way to keep your lawn lush and healthy is to aerate your yard every two to three years. Aeration involves poking holes into the ground to allow air, water, and nutrients to go much deeper into the soil and improve root development. Over time, this will cause your lawn to become much thicker and healthier. You can also aerate your lawn on a yearly basis in high-traffic areas or if you have heavy clay soil.
Trees and Hedges
If your garden includes natural features such as trees or hedges, have these trimmed back by a professional or a skilled amateur. This not only makes it neater, but if nature seems to be taking over your yard, a buyer could suspect that deeper problems may be hidden within.
Paths and Driveways
Next, make sure your paths and driveways are clean, free from weeds, and not suffering from any obvious damage. No buyer wants to consider replacing these hard features within a few short months or years of moving in, so make sure they look their best. Using a pressure hose to remove moss and mold can work wonders.
Dress Up Your Mailbox
If you are a rural resident, you probably have a mailbox at the end of your driveway. If you drive down any road in the country, you will probably see row upon row of mailboxes–all with a similar size and shape.
Those mailboxes might be functional, but they are certainly not attractive. If you want your own mailbox to stand out, a bit of landscaping is in order. You can start by adding a bracket for a hanging basket to the side of your mailbox, then filling it with an ever-changing variety of fresh flowers and colorful plants.
You can also landscape the area around your mailbox, surrounding it with colorful stones, interesting rocks and other accents. This type of landscaping will also help to protect your mailbox from erosion and other damage. When the spring rains come, the rocks and stones will help keep the soil where it belongs and possibly prevent your mailbox from being washed away.
Your Home Itself
The final points to check are all found on the exterior of your property’s structure. Is the paintwork clean and fresh-looking, or would it benefit from a new coat? Is the color nicely neutral, or quirky and unusual? Although a little character is a good selling point, anything too outlandish will significantly reduce the breadth of your home’s appeal. Are the windows clean, and do all the external doors look in good, secure condition?

Mulch In The Fall
Mulch In The Fall
The need to mulch your landscape in the fall largely depends on climate. Here in central Indiana specifically, we are no stranger to extreme swings in temperate and freeze and thaw cycles (you’ve seen the potholes!). Mulching around plants, especially precious perennials in autumn protects against these changes in temperature and precipitation, prevents erosion, and enriches your soil throughout the winter months.
When your annuals are dead, any vegetables have produced their last bounty and every last weed has been plucked after the first frost, it’s time to prepare for the winter ahead with more mulch. Consult with your local supplier to identify the product for you. As we always say—bark is best. This means you should be looking for a high bark content in your mulch choice because as it breaks down (which quality mulch is supposed to do) it is going to restore the most nutrients to your soil for the next growth cycle of your plants.
Here are a few more things to consider when it comes to mulching in the fall:
- Mulching is hard work- do it when the weather is more tolerable and refresh with a thin, cosmetic layer in the spring
- Plant growth this time of year is slow and perennials are well established- you won’t have to worry about suffocating or damaging new growth in the spring
- As always, spread a thick layer—anywhere from two to four inches is perfection!
We are not oblivious to the fact that most people just don’t love to mulch as much as we do, and most certainly not enough to do it twice per year. But, your landscape is an investment- in need of maintenance and proper protection like anything else in and around your home. As always, if you need help identifying the right landscaper to do the heavy lifting for you—give us a call.